
CockroachDB on Kubernetes
CockroachDB is built to survive node failures without losing data, which makes Kubernetes a natural home for it. In this post, I’ll show how to deploy CockroachDB to your cluster and configure it, then stand up an example application so we can watch firsthand how gracefully it handles a node or pod going down.
The first thing we need is the database itself. The official documentation walks you through a Helm install, but hey, we want to see those YAMLs, right? So we will use the StatefulSet YAML that CockroachDB provides in its own repo. You can run your DB in secure or insecure mode. Secure means generating certificates and using TLS for the connections between nodes, and that’s the route we’ll take here (because TLS, that’s why).
$kubectl apply -f https://raw.githubusercontent.com/cockroachdb/cockroach/master/cloud/kubernetes/cockroachdb-statefulset.yaml
This spins up 3 replicas of CockroachDB. You’ll notice the pods sitting in a pending init status, and that’s expected, they’re busy trying to create their certificates.
$ kubectl get po
NAME READY STATUS RESTARTS AGE
cockroachdb-0 0/1 Init:0/1 0 4m3s
cockroachdb-1 0/1 Init:0/1 0 4m2s
cockroachdb-3 0/1 Init:0/1 0 4m2s
To confirm that, let’s peek at one of the logs. All we see is the init-cert container output, because that’s the step currently in flight.
$ kubectl logs cockroachdb-0 -c init-certs

Request sent, waiting for approval. To approve, run 'kubectl certificate approve default.node.cockroachdb-0'
2019-05-29 09:06:55.291231733 +0000 UTC m=+30.302293510: waiting for 'kubectl certificate approve default.node.cockroachdb-0'
So the certificates are waiting on us. Let’s approve this one, and the others alongside it. This can of course be automated.
$kubectl certificate approve default.node.cockroachdb-0

$kubectl certificate approve default.node.cockroachdb-1

$kubectl certificate approve default.node.cockroachdb-2
Now the pods are running, though readiness is still failing with ‘HTTP 503’. No worries, the installation simply isn’t finished yet.
The remaining piece is a job to initialize CockroachDB, which in turn creates another certificate for default.client.root.
$ kubectl create -f cluster-init-secure.yaml
job.batch/cluster-init-secure created
$ kubectl certificate approve default.client.root
certificatesigningrequest.certificates.k8s.io/default.client.root approve
With that approved, the pods come up healthy and CockroachDB is running without problems.
As the documentation explains, to actually reach the DB we need a client pod. From there it’s just a matter of running ./cockroach sql --cert-dir=.. and so on.
We’ll also want a user before we can log into the UI, so let’s create one.
$kubectl exec -it cockroachdb-client ./cockroach sql --certs-dir=/cockroach-certs --host=cockroachdb-public
./cockroach sql --certs-dir=/cockroach-certs --host=cockroachdb-public
 Welcome to the cockroach SQL interface.
 All statements must be terminated by a semicolon.
 To exit: CTRL + D.
 #
 Server version: CockroachDB CCL v19.1.0 (x86_64-unknown-linux-gnu, built 2019/04/29 18:36:40, go1.11.6) (same version as client)
 Cluster ID: c50f8709-00cb-4f80-a804-4961c36b97cb
 #
 Enter \? for a brief introduction.

$root@cockroachdb-public:26257/defaultdb> CREATE USER fahri WITH PASSWORD 'blog';
 CREATE USER 1
 Time: 238.920551ms
And there’s our first CockroachDB user. Now let’s open the web UI with it.
We could go the full route with a service, ingress, and so on, but for now let’s just pick a single pod for the DB.
$kubectl port-forward cockroachdb-1 8080
And log in to https://localhost:8080/.

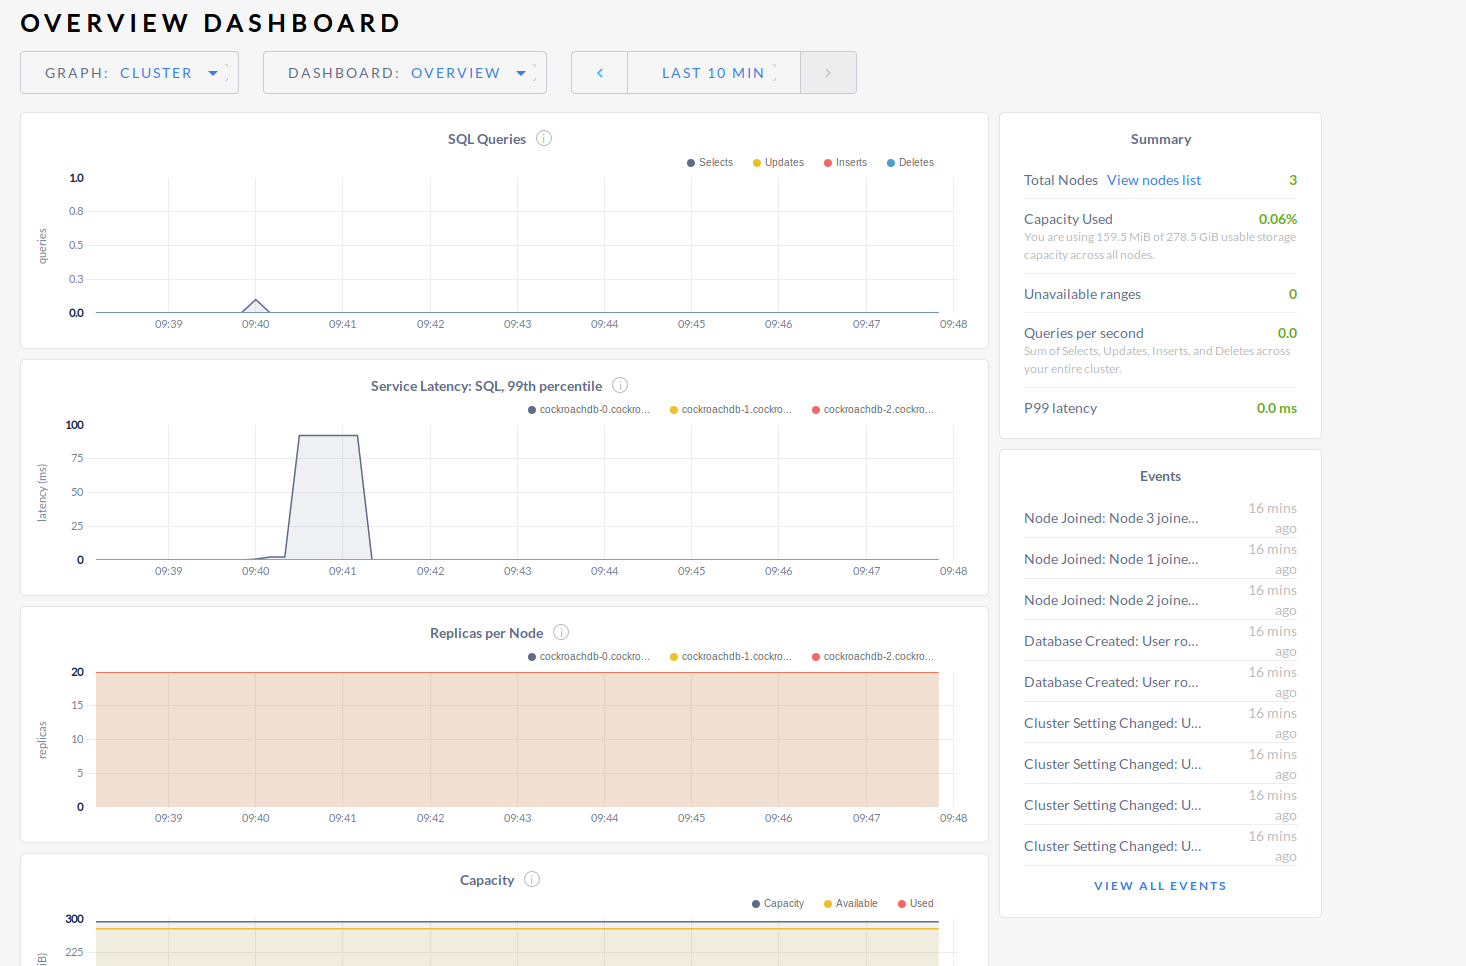
Most usefully, the UI gives us a clean view of cluster metrics alongside the latest events.
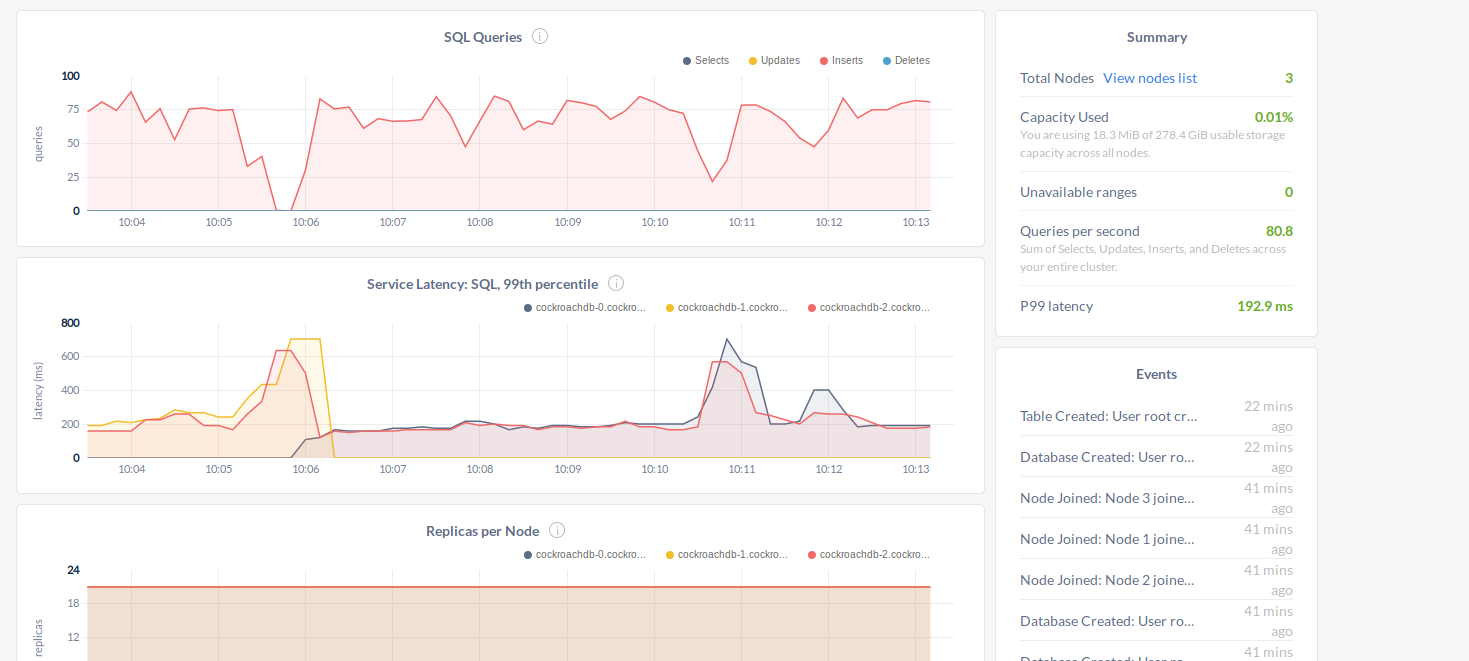
Now let’s put some load on it. CockroachDB speaks the PostgreSQL wire protocol, so you can connect with a PostgreSQL driver, which is wonderful when building applications. To drive traffic, we’ll use loadgen-kv just as the CockroachDB repo shows.
And with that, our simple load generator is up and running.
Here comes the interesting bit: let’s delete one pod and see how the cluster reacts. Because these pods rely on persistent volume claims, they recover easily, only needing fresh data after the init.
$kubectl delete pod cockroachdb-0
And watch how the requests get handled.
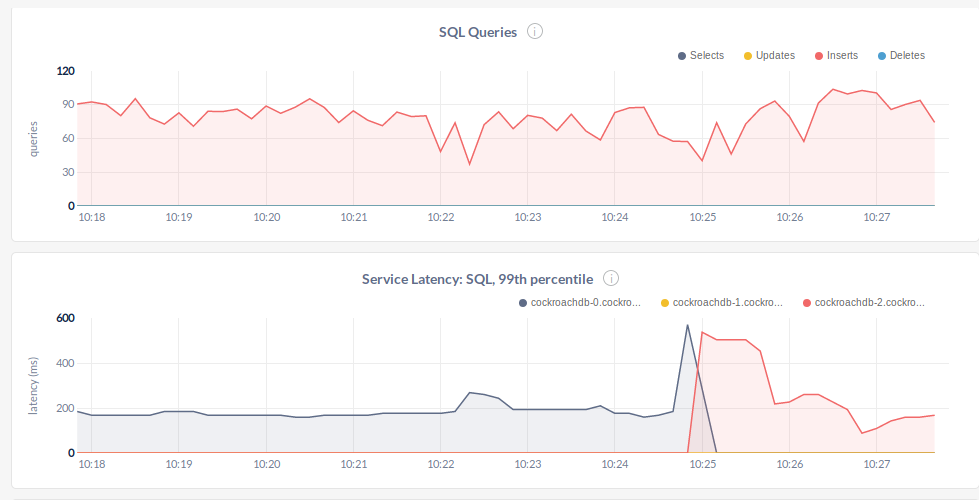
What we see is the load generator sending requests to our service, but once it connects to a pod it always talks to the same DB. That mirrors how the PostgreSQL driver lets you select only one instance at a time (and yes, you can load balance them). Since we deleted node-0, the traffic shifts over to node-2, and for a short window the latency runs about 3x higher than normal before settling.
There’s also a handy per-query stats page.

This page tells us whether a query is distributed, whether it failed, what its latency was, and more.
Future Work:
- Make a distributed query/load generator and do this example again?
- How will the cluster handle a bigger query if one node is down? Does this affect our nodes’ initialization time, and if so, how long?