
Using Traffic Shifting on Istio to make Blue/Green Deployments on Kubernetes
In this post i’ll show how to do blue/green deployements on Kubernetes using Istio.
After installation we should create our namespace and set istio sidecar injection. Im using namespace label with automated injection using
kubectl create ns webischia && kubectl label namespace webischia istio-injection=enabled
Our test yaml:
apiVersion: v1
kind: Service
metadata:
  name: webischia
  labels:
    app: webischia
spec:
  ports:
  - port: 80
    name: http
  selector:
    app: webischia
---
apiVersion: extensions/v1beta1
kind: Deployment
metadata:
  name: webischia-v1
spec:
  replicas: 1
  template:
    metadata:
      labels:
        app: webischia
        version: v1
    spec:
      containers:
      - name: webischia
        image: ffahri/bluedep
        imagePullPolicy: IfNotPresent
        ports:
        - containerPort: 80
---
apiVersion: extensions/v1beta1
kind: Deployment
metadata:
  name: webischia-v2
spec:
  replicas: 1
  template:
    metadata:
      labels:
        app: webischia
        version: v2
    spec:
      containers:
      - name: webischia
        image: ffahri/greendep
        imagePullPolicy: IfNotPresent
        ports:
        - containerPort: 80
---
Applying this yaml using
kubectl apply -f webischia.yaml -n webischia
root@frankfurt-kubeadm1-ub2g:~/# kubectl apply -f blue-green.yaml -n webischia
service/webischia created
deployment.extensions/webischia-v1 created
deployment.extensions/webischia-v2 created
Now we need to create istio gateway for our service and define route rules
apiVersion: networking.istio.io/v1alpha3
kind: DestinationRule
metadata:
  name: webischia
spec:
  host: webischia
  subsets:
  - name: v1
    labels:
      version: v1
  - name: v2
    labels:
      version: v2
apiVersion: networking.istio.io/v1alpha3
kind: Gateway
metadata:
  name: webischia-gateway
spec:
  selector:
    istio: ingressgateway # use istio default controller
  servers:
  - port:
      number: 80
      name: http
      protocol: HTTP
    hosts:
    - "*"
---
apiVersion: networking.istio.io/v1alpha3
kind: VirtualService
metadata:
  name: webischia
spec:
  hosts:
  - "*"
  gateways:
  - webischia-gateway
  http:
  - match:
    - uri:
        exact: /
    route:
    - destination:
        host: webischia
        subset: v1
        port:
          number: 80
kubectl apply -f gateway.yaml -n webischia
gateway.networking.istio.io/webischia-gateway created
virtualservice.networking.istio.io/webischia created
These create gateway and virtualservice for our app.
After that we can use istio-ingressgateway to test our system.
We select v1 for all traffic we should always see blue webischia.
for i in {0..999} ; do curl http://159.89.3**.***/;echo ; done
<h1 style='color:blue'>Blue WebIschia</h1>
<h1 style='color:blue'>Blue WebIschia</h1>
<h1 style='color:blue'>Blue WebIschia</h1>
<h1 style='color:blue'>Blue WebIschia</h1>
<h1 style='color:blue'>Blue WebIschia</h1>
Monitoring of these services(thanks istio for taking care of all 🙂 )

And lets say we created new versino and want to publish but split traffic by %80 to %20.
- route:
    - destination:
        host: webischia
        subset: v1
      weight: 80
    - destination:
        host: webischia
        subset: v2
      weight: 20
As you can see our graphics shows traffic shifting is applied.
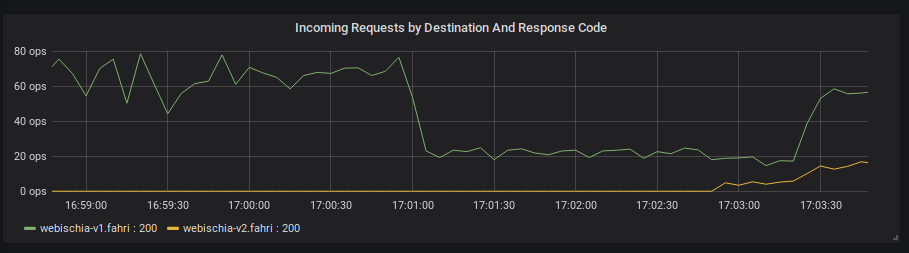
This happen without any server or client side errors.

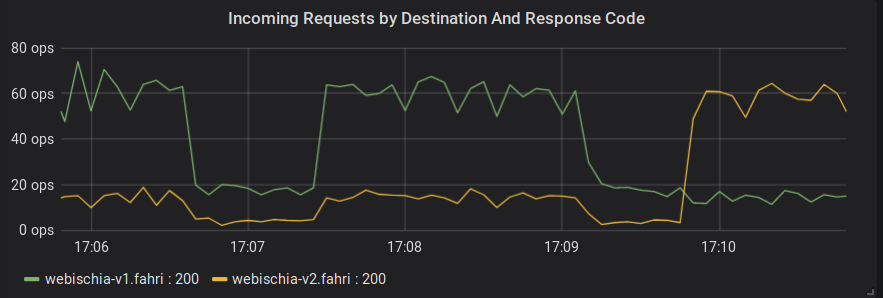
Now lets our weights 80 green 20 blue.
- route:
    - destination:
        host: webischia
        subset: v1
      weight: 20
    - destination:
        host: webischia
        subset: v2
      weight: 80
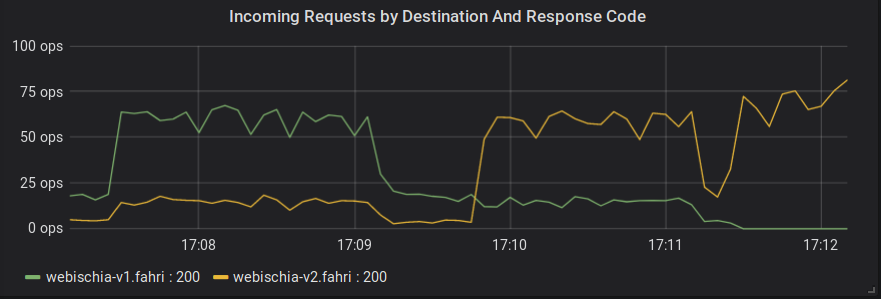
And finally we can fully shift to green.
- route:
    - destination:
        host: webischia
        subset: v1
      weight: 0
    - destination:
        host: webischia
        subset: v2
      weight: 100
Conclusion:
Istio shows us we can do traffic shifting so much easy. Observabilty is also a big deal and super easy with istio.