
IoT and C# – Measuring Room Temperature, Humidity, and Light Intensity and Saving Them to a Database
In this post we take a small trip into the world of the Internet of Things: we read measurements with an Arduino and an ESP-01 WiFi module, and then lean on C# to store those measurements in a database.
The goal is a program that, using an Arduino together with temperature and humidity sensors, records the temperature, humidity, and light intensity of two different locations at set intervals and saves them into a SQL Server 2014 database.
We start with the Arduino side of things.
(–To be added–)
Next comes the database, where we set up the tables we will be using.
Here we create a database called KontrolDB. We keep track of the rooms and their descriptions, and every measurement, along with the time it was transferred, goes into a table named ‘valuesroom’.
Queries like which room sat at how many degrees during which intervals we set up under Views and then wire into our program.
use master
go
create database KontrolDB
go
use KontrolDB
go
create table rooms
(
id int primary key identity(1,1),
descp nvarchar(30)
)
go
create table valuesroom
(
id int primary key identity(1,1),
roomid int foreign key rooms(id),
heat tinyint not null,
moisture tinyint not null,
lightdegree int not null,
calcdate datetime default(getdate())
)
At its core the program is made up of two forms. The first handles the serial port operations for the device plugged into the computer, while the second is there for past measurement statistics.
In both forms, this is the line we use to connect to the database.
SqlConnection baglanti =
       new SqlConnection(@"Data Source=User\SQLEXPRESS;Initial Catalog=KontrolDB;Integrated Security=True");
Since the readings come in over the port the Arduino is attached to, we read from there. In this case the COM3 port was used.
serialPort1.PortName = "COM3";
            baglanti.Open();
            serialPort1.Open();
                //ısı 1 - nem 2 - ışık şiddeti 3
                string[] degerler = new String[3];
                serialPort1.Write("1");
                Double isi = Convert.ToDouble(serialPort1.ReadExisting());
                label2.Text = label2.Text + " " + isi.ToString() + "C";
                degerler[0] = Convert.ToString(isi);
                serialPort1.Write("2");
                Double nem = Convert.ToDouble(serialPort1.ReadExisting());
                label3.Text = label3.Text + " %" + nem.ToString() + "";
                degerler[1] = Convert.ToString(nem);
                serialPort1.Write("3");
                Double isik = Convert.ToDouble(serialPort1.ReadExisting());
                label3.Text = label3.Text + " " + isik.ToString() + "";
                degerler[2] = Convert.ToString(isik);
With the values collected, we then save the degerler (values) array into the database we built above.
To run the query, I used this line.
SqlCommand komut = new SqlCommand(sorgu, baglanti);
            komut.ExecuteNonQuery();
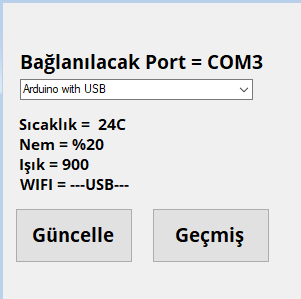
When we run the program and select the USB connection, this is the view we end up with.
– Turkish Version –
IoT ve C# – Oda sıcaklıklarını, nemini ve ışık şiddetini ölçüp veritabanına kayıt etmek
Bu yazımızda nesnelerin interneti dünyasına küçük bir yolculuk yapıyoruz: Arduino ve ESP-01 wifi modülü ile ölçümler alıp, bu ölçümleri C# yardımıyla veritabanına kaydediyoruz.
Amacımız, Arduino ile sıcaklık ve nem sensörlerini kullanarak 2 farklı lokasyondaki sıcaklığı, nemi ve ışık şiddetini belirli aralıklarla kaydedip SQL Server 2014 veritabanına yazan bir program.
İşe Arduino ile ilgili kısımlardan başlıyoruz.
(–Eklenecek–)
Sıra, kullanacağımız veritabanını ve tabloları oluşturmaya geliyor.
Burada KontrolDB adında bir veritabanı oluşturuyoruz. Odaları ve tanımlarını alıyoruz, ve her ölçümü aktarıldığı zamanla beraber ‘valuesroom’ adlı tabloya kaydediyoruz.
Hangi odanın hangi aralıklarda kaç derece olduğu gibi sorguları Views adı altında oluşturup programımıza ekliyoruz.
use master
go
create database KontrolDB
go
use KontrolDB
go
create table rooms
(
id int primary key identity(1,1),
descp nvarchar(30)
)
go
create table valuesroom
(
id int primary key identity(1,1),
roomid int foreign key rooms(id),
heat tinyint not null,
moisture tinyint not null,
lightdegree int not null,
calcdate datetime default(getdate())
)
Programımız temelde 2 formdan oluşuyor. İlk form bilgisayara bağlı cihazın seri port işlemleri için, diğer form ise geçmiş ölçüm istatistikleri için kullanılıyor.
Her iki formda da veritabanına bağlanmak için bu satırı kullanıyoruz.
SqlConnection baglanti =
       new SqlConnection(@"Data Source=User\SQLEXPRESS;Initial Catalog=KontrolDB;Integrated Security=True");
Veriler Arduinonun bağlı olduğu porttan geldiği için oradan okuma yapmamız gerekiyor. Burada COM3 portu kullanıldı.
serialPort1.PortName = "COM3";
            baglanti.Open();
            serialPort1.Open();
                //ısı 1 - nem 2 - ışık şiddeti 3
                string[] degerler = new String[3];
                serialPort1.Write("1");
                Double isi = Convert.ToDouble(serialPort1.ReadExisting());
                label2.Text = label2.Text + " " + isi.ToString() + "C";
                degerler[0] = Convert.ToString(isi);
                serialPort1.Write("2");
                Double nem = Convert.ToDouble(serialPort1.ReadExisting());
                label3.Text = label3.Text + " %" + nem.ToString() + "";
                degerler[1] = Convert.ToString(nem);
                serialPort1.Write("3");
                Double isik = Convert.ToDouble(serialPort1.ReadExisting());
                label3.Text = label3.Text + " " + isik.ToString() + "";
                degerler[2] = Convert.ToString(isik);
Değerleri topladıktan sonra degerler dizisini yukarıda oluşturduğumuz veritabanına kaydediyoruz.
Sorguyu execute etmek için bu satırı kullandım.
SqlCommand komut = new SqlCommand(sorgu, baglanti);
            komut.ExecuteNonQuery();
Programı çalıştırıp USB bağlantısını seçtiğimizde bu görüntüyü elde ediyoruz.